本章将通过在 Spring Boot 中集成 Nacos,并且开启配置管理功能,快速了解如何将在项目中使用 Nacos 实现配置管理。
准备工作
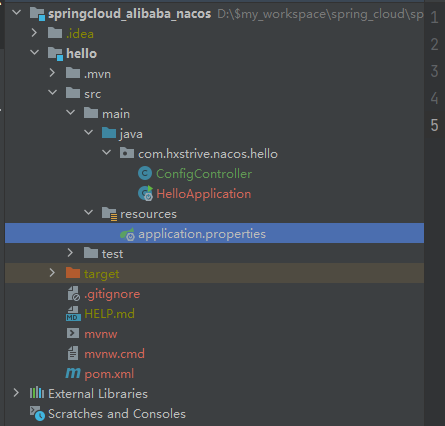
使用 IDEA 创建一个 Spring Boot 项目(Maven),项目结构如下图:

版本信息:
注意:在开始运行项目前,请先启动 Nacos 服务(如何启动 Nacos 请参考 “Nacos 快速开始” 章节)。
项目依赖
在项目 pom.xml 中添加 Nacos 依赖,完整 pom.xml 如下:
<?xml version="1.0" encoding="UTF-8"?>
<project xmlns="http://maven.apache.org/POM/4.0.0" xmlns:xsi="http://www.w3.org/2001/XMLSchema-instance"
        xsi:schemaLocation="http://maven.apache.org/POM/4.0.0 https://maven.apache.org/xsd/maven-4.0.0.xsd">
   <modelVersion>4.0.0</modelVersion>
   <parent>
       <groupId>org.springframework.boot</groupId>
       <artifactId>spring-boot-starter-parent</artifactId>
       <version>2.2.6.RELEASE</version>
       <relativePath/>
   </parent>
   <groupId>com.hxstrive.nacos</groupId>
   <artifactId>hello</artifactId>
   <version>0.0.1-SNAPSHOT</version>
   <name>hello</name>
   <description>hello</description>

   <properties>
       <java.version>1.8</java.version>
   </properties>

   <dependencies>
       <!-- Nacos依赖信息 -->
       <dependency>
           <groupId>com.alibaba.boot</groupId>
           <artifactId>nacos-config-spring-boot-starter</artifactId>
           <version>0.2.7</version>
       </dependency>

       <dependency>
           <groupId>org.springframework.boot</groupId>
           <artifactId>spring-boot-starter</artifactId>
       </dependency>
       <dependency>
           <groupId>org.springframework.boot</groupId>
           <artifactId>spring-boot-starter-web</artifactId>
       </dependency>
       <dependency>
           <groupId>org.springframework.boot</groupId>
           <artifactId>spring-boot-devtools</artifactId>
           <scope>runtime</scope>
           <optional>true</optional>
       </dependency>
       <dependency>
           <groupId>org.springframework.boot</groupId>
           <artifactId>spring-boot-starter-test</artifactId>
           <scope>test</scope>
       </dependency>
   </dependencies>

   <build>
       <plugins>
           <plugin>
               <groupId>org.springframework.boot</groupId>
               <artifactId>spring-boot-maven-plugin</artifactId>
           </plugin>
       </plugins>
   </build>

</project>
项目代码
项目入口类
在项目入口类上,使用 @NacosPropertySource 注解加载 dataId 为 example 的配置源,并开启自动更新。代码如下:
package com.hxstrive.nacos.hello;

import com.alibaba.nacos.spring.context.annotation.config.NacosPropertySource;
import org.springframework.boot.SpringApplication;
import org.springframework.boot.autoconfigure.SpringBootApplication;

@SpringBootApplication
// 看这里
@NacosPropertySource(dataId = "example", autoRefreshed = true)
public class HelloApplication {

   public static void main(String[] args) {
       SpringApplication.run(HelloApplication.class, args);
   }

}
控制器类
创建一个控制器 ConfigController 类,通过 Nacos 的 @NacosValue 注解设置 useLocalCache 属性的值。代码如下:
package com.hxstrive.nacos.hello;

import com.alibaba.nacos.api.config.annotation.NacosValue;
import org.springframework.stereotype.Controller;
import org.springframework.web.bind.annotation.RequestMapping;
import org.springframework.web.bind.annotation.ResponseBody;

import static org.springframework.web.bind.annotation.RequestMethod.GET;

/**
* 获取配置控制器
* @author hxstrive.com
*/
@Controller
@RequestMapping("config")
public class ConfigController {

   @NacosValue(value = "${useLocalCache:false}", autoRefreshed = true)
   private boolean useLocalCache;

   // 可以通过 /config/get 接口获取
   @RequestMapping(value = "/get", method = GET)
   @ResponseBody
   public boolean get() {
       return useLocalCache;
   }

}
项目配置
打开 resource/application.properties 属性配置文件,添加 nacos.config.server-addr 配置,指定 Nacos 服务地址,配置如下:
# 配置 Nacos 为本地服务
nacos.config.server-addr=127.0.0.1:8848
启动项目
运行 HelloApplication,如果启动成功,则使用浏览器访问 http://localhost:8080/config/get 地址,此时将返回 false(这是因为我们并没有在 Nacos 中写入配置信息),如下图:

Nacos 创建配置
我们可以选择两种方式到 Nacos 创建配置信息:
方式一:使用 CURL 发起请求,如:curl -X POST "http://127.0.0.1:8848/nacos/v1/cs/configs?dataId=example&group=DEFAULT_GROUP&content=useLocalCache=true",或者使用 ApiFox 工具调用该 URL,可参考 “Nacos 简单应用”。
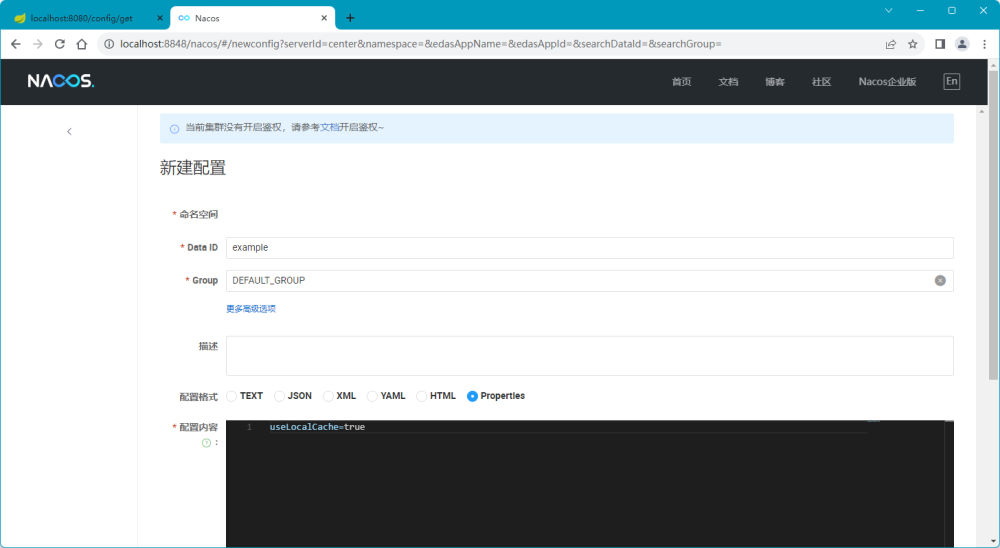
方式二:访问 http://localhost:8848/nacos 地址,通过可视化页面创建配置信息,如下图:

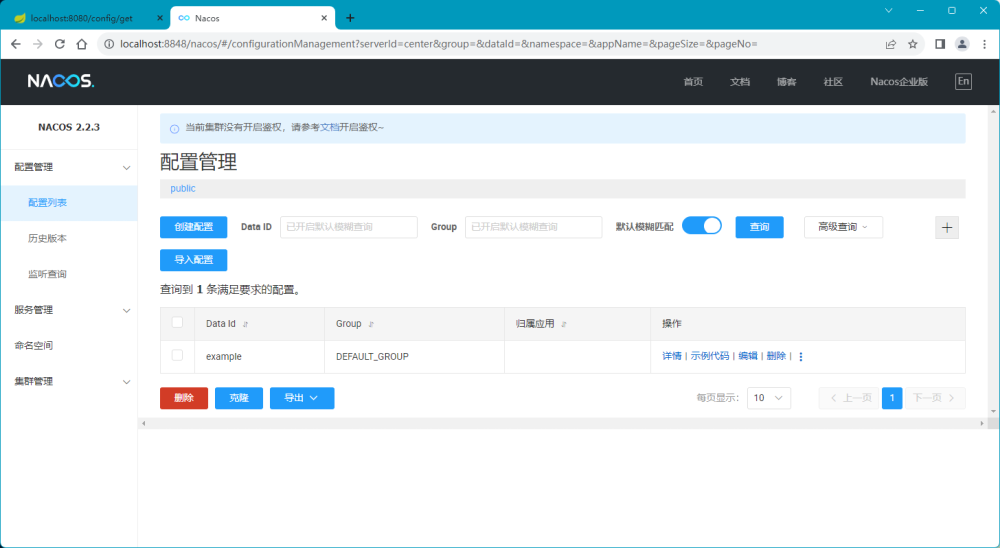
创建完成的配置信息如下图:

最后,配置创建完成后,重新访问 http://localhost:8080/config/get 接口,此时返回 true,如下图:


