上一章节介绍了 Spring Boot 远程应用,在本地连接到远程应用,当本地资源改变后,传递到远程应用,然后重启远程应用。
Java 的远程调试在诊断远程应用问题时很有用,不幸的是,当应用部署在你的数据中心外时,它并不总能够启用远程调试。如果你使用基于容器的技术,比如 Docker,远程调试设置起来非常麻烦。
为了突破这些限制,devtools 支持基于 HTTP 的远程调试通道。
远程客户端在 8000 端口提供一个本地 server,这样远程 debugger 就可以连接了。一旦连接建立,调试 信息就通过 HTTP 发送到远程应用。你可以使用 spring.devtools.remote.debug.local-port 属性设置不同的端口。
你需要确保远程应用启动时开启了远程调试功能,通常,这可以通过配置 JAVA_OPTS 实现。
Spring Boot 开启远程调试
你可以运行如下命令去启动 Spring Boot 远程调试,如下:
java -Xdebug -Xrunjdwp:server=y,transport=dt_socket,address=8000,suspend=n -jar springboot.jar
参数说明:
-Xdebug 表示项目工作在 debug 模式下
address=8000 开放 8000 作为调试端口
server=y 表示在远程 Debug 会话的过程中作为服务端
suspend=y 表示在客户端建立连接前,服务端被挂起;suspend=n 则不会被挂起(专门调试时建议设置成y)。
Spring Boot 开启远程调试的输出日志如下:
C:\Users\Administrator\Desktop>java -Xdebug -Xrunjdwp:server=y,transport=dt_socket,address=8000,suspend=n -jar springboot.jar
Listening for transport dt_socket at address: 8000
{spring.web.resources.chain.cache=false, spring.web.resources.cache.period=0}

  .   ____          _            __ _ _
 /\\ / ___'_ __ _ _(_)_ __  __ _ \ \ \ \
( ( )\___ | '_ | '_| | '_ \/ _` | \ \ \ \
 \\/  ___)| |_)| | | | | || (_| |  ) ) ) )
  '  |____| .__|_| |_|_| |_\__, | / / / /
 =========|_|==============|___/=/_/_/_/
 :: Spring Boot ::                (v2.4.0)

2020-11-21 14:22:16.737  INFO 12824 --- [           main] h.s.s.SpringbootDevtoolsDemo1Application : Starting SpringbootDevtoolsDemo1Application v0.0.1-SNAPSHOT using Java 1.8.0_45 on MS-OYCYMLXUSLLD with PID 12824 (C:\Users\Administrator\Desktop\springboot.jar started by Administrator in C:\Users\Administrator\Desktop)
2020-11-21 14:22:16.748  INFO 12824 --- [           main] h.s.s.SpringbootDevtoolsDemo1Application : No active profile set, falling back to default profiles: default
2020-11-21 14:22:16.973  INFO 12824 --- [           main] .e.DevToolsPropertyDefaultsPostProcessor : Devtools property defaults active! Set 'spring.devtools.add-properties' to 'false' to disable
2020-11-21 14:22:16.975  INFO 12824 --- [           main] .e.DevToolsPropertyDefaultsPostProcessor : For additional web related logging consider setting the 'logging.level.web' property to 'DEBUG'
2020-11-21 14:22:22.720  INFO 12824 --- [           main] o.s.b.w.embedded.tomcat.TomcatWebServer  : Tomcat initialized with port(s): 8080 (http)
2020-11-21 14:22:22.761  INFO 12824 --- [           main] o.apache.catalina.core.StandardService   : Starting service [Tomcat]
2020-11-21 14:22:22.763  INFO 12824 --- [           main] org.apache.catalina.core.StandardEngine  : Starting Servlet engine: [Apache Tomcat/9.0.39]
2020-11-21 14:22:22.968  INFO 12824 --- [           main] o.a.c.c.C.[Tomcat].[localhost].[/]       : Initializing Spring embedded WebApplicationContext
2020-11-21 14:22:22.970  INFO 12824 --- [           main] w.s.c.ServletWebServerApplicationContext : Root WebApplicationContext: initialization completed in 5966 ms
2020-11-21 14:22:23.042  WARN 12824 --- [           main] .s.b.d.a.RemoteDevToolsAutoConfiguration : Listening for remote restart updates on /.~~spring-boot!~/restart
2020-11-21 14:22:23.833  INFO 12824 --- [           main] o.s.s.concurrent.ThreadPoolTaskExecutor  : Initializing ExecutorService 'applicationTaskExecutor'
2020-11-21 14:22:24.202  INFO 12824 --- [           main] o.s.b.a.w.s.WelcomePageHandlerMapping    : Adding welcome page template: index
2020-11-21 14:22:25.385  INFO 12824 --- [           main] o.s.b.w.embedded.tomcat.TomcatWebServer  : Tomcat started on port(s): 8080 (http) with context path ''
springboot广告位
IDEA 实现远程调试
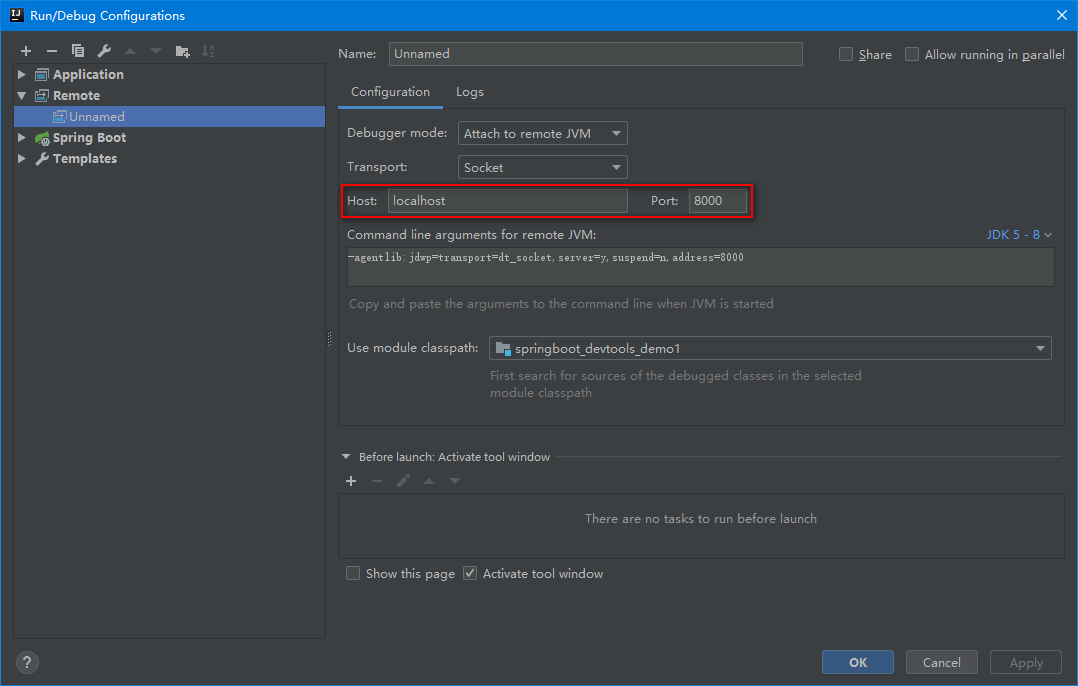
(1)在 IDEA 中打开“Run/Debug Configurations”窗口,在 Host 和 Port 分别填写远程 Spring Boot 服务的 IP 地址和端口。如下图:

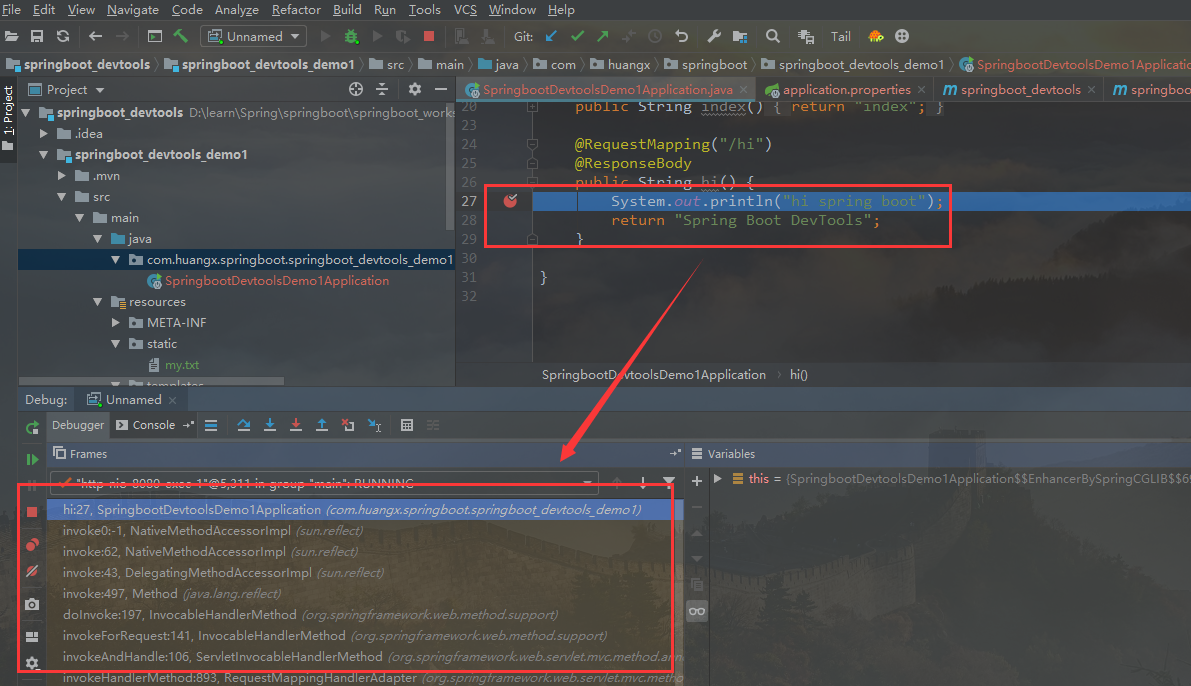
(2)运行刚刚创建的远程应用,然后在某个方法中打上断点。通过浏览器查看 /hi 接口,这时候将进入 hi() 方法的断点。如下图:

注意:调试基于 Internet 的远程服务可能很慢,你可能需要增加IDE的超时时间。例如,在 Eclipse 中你可以从 Preferences… 选择 Java -> Debug ,改变 Debugger timeout (ms) 为更合适的值(60000在多数情况下就能解决)。


