什么是 IoC ?
IoC(Inversion of Control,控制反转)是 Spring 框架的核心概念之一。它是一种软件设计原则,通过将对象的创建和依赖关系的管理交给容器来实现,而不是由开发人员手动管理。
在传统的编程模型中,开发人员需要自己创建和管理对象的实例,并手动解决对象之间的依赖关系。这样的方式存在一些问题,如代码的耦合度高、难以进行单元测试、难以实现代码的可重用性等。
而通过 IoC,开发人员只需定义对象的依赖关系,由容器负责创建和管理对象的实例。容器会根据配置文件或注解来自动创建对象,并将依赖的对象注入到需要的地方。这样可以实现代码的解耦、模块化和可测试性。
具体来说,IoC 有两种实现方式:
(1)依赖注入(Dependency Injection,DI):通过依赖注入,容器会自动将依赖的对象注入到需要的地方。开发人员只需定义对象的依赖关系,容器会根据配置文件或注解来自动解析依赖关系并注入对象。
(2)依赖查找(Dependency Lookup):通过依赖查找,开发人员可以通过容器来获取所需的对象实例。开发人员只需向容器请求所需的对象,容器会根据配置文件或注解来查找并返回对象实例。
通过 IoC,开发人员可以将关注点从对象的创建和依赖关系的管理转移到业务逻辑的实现上,提高了代码的可维护性、可测试性和可扩展性。
在 Spring 框架中,IoC 是通过 Spring 容器实现的。Spring 容器负责管理对象的生命周期和依赖关系,并提供了一系列的注解和配置方式来实现 IoC。开发人员只需使用这些注解和配置方式,就可以享受到 IoC 带来的便利和好处。
spring广告位
示例分析
下面通过一个示例分析传统实现对象依赖和采用 Spring IoC 的区别,假如我们有一个车 Car 对象,他有一个引擎对象 Engine 和四个轮胎 Tyre 对象,下面将展示如何去构建一辆车。
代码如下:
// Car.java
/**
* 一辆汽车
* @author hxstrive.com
*/
public class Car {
   // 一个引擎
   private Engine engine;
   // 左前轮
   private Tyre frontLeft;
   // 右前轮
   private Tyre frontRight;
   // 左后轮
   private Tyre backLeft;
   // 右后轮
   private Tyre backRight;

   public Car(Engine engine, Tyre frontLeft, Tyre frontRight, Tyre backLeft, Tyre backRight) {
       this.engine = engine;
       this.frontLeft = frontLeft;
       this.frontRight = frontRight;
       this.backLeft = backLeft;
       this.backRight = backRight;
   }

   public void run() {
       if(null != this.engine && null != this.frontLeft && null != this.frontRight
               && null != this.backLeft && null != this.backRight) {
           System.out.println("汽车开始跑了");
           this.engine.run();
           this.frontLeft.run("左前轮");
           this.frontRight.run("右前轮");
           this.backLeft.run("左后轮");
           this.backRight.run("右后轮");
       } else {
           System.err.println("汽车没有组装完成,不能跑");
       }
   }
}

// Engine.java
/**
* 一个汽车引擎
* @author hxstrive.com
*/
public class Engine {

   public void run() {
       System.out.println("引擎运行中....");
   }

}

// Tyre.java
/**
* 一个汽车轮胎
* @author hxstrive.com
*/
public class Tyre {

   public void run(String message) {
       System.out.println(message + "运行中...");
   }

}
传统实现
下面通过传统方式去创建一个 Car 实例的代码:
public class Main {

   public static void main(String[] args) {
       Engine engine = new Engine();
       Tyre frontLeft = new Tyre();
       Tyre frontRight = new Tyre();
       Tyre backLeft = new Tyre();
       Tyre backRight = new Tyre();

       Car car = new Car(engine, frontLeft, frontRight, backLeft, backRight);
       car.run();
   }

}
运行示例,输出如下:
汽车开始跑了
引擎运行中....
左前轮运行中...
右前轮运行中...
左后轮运行中...
右后轮运行中...
上述代码中,我们通过 new 创建了一个 Car、一个 Engine 和四个 Tyre 的实例,如果 Tyre 有其他实现呢?我们是不是需要将所有创建 Tyre 的语句进行修改。
Spring IoC 实现
下面通过 Spring Ioc 的方式去创建 Car 实例,通过 XML 文件描述它们之间的依赖关系。
(1)applicationContext-ioc-demo1.xml 用来描述 bean 之间的依赖关系,内容如下:
<?xml version="1.0" encoding="UTF-8"?>
<beans xmlns="http://www.springframework.org/schema/beans"
      xmlns:xsi="http://www.w3.org/2001/XMLSchema-instance"
      xsi:schemaLocation="http://www.springframework.org/schema/beans
           http://www.springframework.org/schema/beans/spring-beans.xsd">

   <!-- 创建引擎 -->
   <bean id="engine" class="com.hxstrive.spring5.ioc.demo1.Engine" />
   <!-- 创建左前轮 -->
   <bean id="frontLeft" class="com.hxstrive.spring5.ioc.demo1.Tyre" />
   <!-- 创建右前轮 -->
   <bean id="frontRight" class="com.hxstrive.spring5.ioc.demo1.Tyre" />
   <!-- 创建左后轮 -->
   <bean id="backLeft" class="com.hxstrive.spring5.ioc.demo1.Tyre" />
   <!-- 创建后右轮 -->
   <bean id="backRight" class="com.hxstrive.spring5.ioc.demo1.Tyre" />

   <!-- 创建一辆车 -->
   <bean id="car" class="com.hxstrive.spring5.ioc.demo1.Car">
       <!-- 设置构造参数值 -->
       <constructor-arg name="engine" ref="engine" />
       <constructor-arg name="frontLeft" ref="frontLeft" />
       <constructor-arg name="frontRight" ref="frontRight" />
       <constructor-arg name="backLeft" ref="backLeft" />
       <constructor-arg name="backRight" ref="backRight" />
   </bean>

</beans>
(2)客户端 MainForSpring.java,代码如下:
import org.springframework.context.ApplicationContext;
import org.springframework.context.support.ClassPathXmlApplicationContext;

/**
* Spring IoC 方式创建 Car
* @author hxstrive.com
*/
public class MainForSpring {

   public static void main(String[] args) {
       // 手动创建 IoC 容器
       ApplicationContext context = new ClassPathXmlApplicationContext("applicationContext-ioc-demo1.xml");
       // 从 Spring IoC 获取实例
       Car car = context.getBean(Car.class);
       car.run();
   }

}
运行示例,输出如下:
汽车开始跑了
引擎运行中....
左前轮运行中...
右前轮运行中...
左后轮运行中...
右后轮运行中...
ApplicationContext 接口
在 Spring 中,org.springframework.context.ApplicationContext 接口代表着 Spring IoC 容器,它负责实例化、配置和组装 bean。容器通过读取配置元数据获取关于要实例化、配置和组装的对象的指令。配置元数据以 XML、Java 注解或 Java 代码等形式来表示。它定义了组成应用程序的对象以及这些对象之间的丰富依赖关系。
Spring 提供了 ApplicationContext 接口的几个实现。在独立应用程序中,通常创建 ClassPathXMLApplicationContext 或 FileSystemXMLApplicationContext 的实例。虽然 XML是定义配置元数据的传统格式,但你可以通过使用 Java 注解或 Java 代码作为元数据格式,并外加少量的 XML 配置,来声明对这些附加元数据格式的支持。
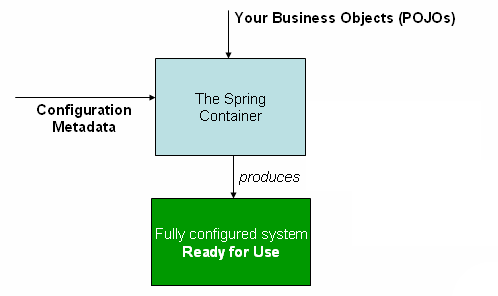
在大多数应用程序场景中,不需要显式代码来实例化 Spring IoC 容器的一个或多个实例。例如,在 Web 应用程序场景中,简单的在 web.xml 中用几行标准 Web 描述符即可。如果你使用 Spring 工具套件(一个支持 Eclipse 的开发环境),只需点击几下鼠标或按键,就可以轻松地创建这个标准配置。下图显示了 Spring 如何工作的高级视图:

上图中,应用程序类(POJO)与配置元数据(Metadata)结合在一起,在创建和初始化 ApplicationContext 之后,你就拥有了一个完全配置且可执行的系统或应用程序。
配置元数据
如上图所示,Spring IoC 容器使用了一种形式的配置元数据(如 XML、Java代码等)去初始化容器。应用程序开发人员通过此配置元数据告诉 Spring IoC 容器如何实例化、配置和组装应用程序中的对象。
传统上,配置元数据以简单直观的 XML 格式提供,这也是本教程大部分配置元数据采用的格式。
基于 XML 的元数据并不是 Spring 唯一允许的配置元数据形式。Spring IoC 容器本身与实际编写配置元数据的格式完全解耦。现在,许多开发人员为他们的 Spring 应用程序选择基于 Java 配置。
Spring IoC 容器支持下面几种格式的元数据配置:
(1)基于 XML 配置:Spring 从诞生开始就完美支持通过 XML 格式配置元数据。
(2)基于注解的配置:Spring 2.5 引入了对基于注解的配置元数据的支持。
(3)基于 Java 的配置:从 Spring 3.0 开始,Spring JavaConfig 项目提供的许多特性成为了核心 Spring 框架的一部分。因此,可以通过使用 Java 而不是 XML 文件来定义应用程序类外部的 bean。要使用这些新特性,请参考 @Configuration、@Bean、@Import 和 @DependsOn 注解。
Spring 配置由容器必须管理的至少一个(通常是多个)bean 定义组成,这些 bean 定义对应于构成应用程序的实际对象。通常定义服务层对象、数据访问对象(DAO)、表示层对象(如 Struts 的 Action 实例)、基础设施对象(如 Hibernate SessionFactories、JMS Queues)等等。
注意:不需要在容器中配置细粒度的领域(POJO)对象,因为创建和加载域对象通常是 DAO 和业务逻辑的责任。但是,您可以使用 Spring 与 AspectJ 的集成来配置在 IoC 容器控制之外创建的对象。
基于 xml 的配置元数据将这些 bean 配置为顶层 <beans/> 元素中的 <bean/> 元素,例如:
<?xml version="1.0" encoding="UTF-8"?>
<beans xmlns="http://www.springframework.org/schema/beans"
      xmlns:xsi="http://www.w3.org/2001/XMLSchema-instance"
      xsi:schemaLocation="http://www.springframework.org/schema/beans
           http://www.springframework.org/schema/beans/spring-beans.xsd">

   <!-- 定义一个 Bean -->
   <bean id="simpleObj" class="com.hxstrive.spring5.ioc.SimpleObj">
       <!-- 初始化构造参数 -->
       <constructor-arg name="message" value="Hello Spring Ioc" />
   </bean>

</beans>
注意:
Java 配置通常在 @Configuration 类中使用带有 @Bean 注解的方法,例如:
import com.hxstrive.spring5.ioc.SimpleObj;
import org.springframework.context.annotation.Bean;
import org.springframework.context.annotation.Configuration;

/**
* 简单的配置类
* @author hxstrive.com
*/
@Configuration
public class SimpleConfig {

   /** 配置一个Bean */
   @Bean
   public SimpleObj simpleObj() {
       return new SimpleObj("Hello Spring IoC");
   }

}
不要忘记添加扫描路径,否则配置类不会生效,XML 配置如下:
<?xml version="1.0" encoding="UTF-8"?>
<beans xmlns="http://www.springframework.org/schema/beans"
      xmlns:xsi="http://www.w3.org/2001/XMLSchema-instance"
      xmlns:context="http://www.springframework.org/schema/context"
      xsi:schemaLocation="http://www.springframework.org/schema/beans
           http://www.springframework.org/schema/beans/spring-beans.xsd
           http://www.springframework.org/schema/context
           http://www.springframework.org/schema/context/spring-context.xsd">

   <context:component-scan base-package="com.hxstrive.spring5.ioc"/>

</beans>
实例化容器
在上面的示例中,提供给 ApplicationContext 构造函数的位置路径是资源路径字符串,它允许容器从各种外部资源,如本地文件系统、Java CLASSPATH等,加载配置元数据。例如:
// 加载 CLASSPATH 下的 services.xml 和 daos.xml 资源文件
ApplicationContext context = new ClassPathXmlApplicationContext("services.xml", "daos.xml");
服务层对象 (services.xml) 配置文件示例如下:
<?xml version="1.0" encoding="UTF-8"?>
<beans xmlns="http://www.springframework.org/schema/beans"
   xmlns:xsi="http://www.w3.org/2001/XMLSchema-instance"
   xsi:schemaLocation="http://www.springframework.org/schema/beans
       https://www.springframework.org/schema/beans/spring-beans.xsd">

   <!-- services -->
   <bean id="petStore" class="org.springframework.samples.jpetstore.services.PetStoreServiceImpl">
       <property name="accountDao" ref="accountDao"/>
       <property name="itemDao" ref="itemDao"/>
       <!-- additional collaborators and configuration for this bean go here -->
   </bean>

   <!-- more bean definitions for services go here -->
</beans>
数据访问对象“daos.xml”文件示例如下:
<?xml version="1.0" encoding="UTF-8"?>
<beans xmlns="http://www.springframework.org/schema/beans"
   xmlns:xsi="http://www.w3.org/2001/XMLSchema-instance"
   xsi:schemaLocation="http://www.springframework.org/schema/beans
       https://www.springframework.org/schema/beans/spring-beans.xsd">

   <bean id="accountDao"
       class="org.springframework.samples.jpetstore.dao.jpa.JpaAccountDao">
       <!-- additional collaborators and configuration for this bean go here -->
   </bean>

   <bean id="itemDao" class="org.springframework.samples.jpetstore.dao.jpa.JpaItemDao">
       <!-- additional collaborators and configuration for this bean go here -->
   </bean>

   <!-- more bean definitions for data access objects go here -->
</beans>
在上面的示例中,服务层由 PetStoreServiceImpl 类和两个类型为 JpaAccountDao 和 JpaItemDao 的数据访问对象 (基于JPA对象 — 关系映射标准) 组成。属性 name 元素引用 JavaBean 属性的名称,ref 元素引用另一个 bean 定义的名称。id 和 ref 元素之间的这种链接表达了协作对象之间的依赖关系。
编写基于XML的配置元数据
让 bean 的定义跨多个 XML 文件是很有用的。通常,每个单独的 XML 配置文件表示体系结构中的一个逻辑层或模块。
可以使用应用程序上下文构造函数从所有这些 XML 片段加载 bean 定义。这个构造函数接受多个 Resource 位置,如前一节所示。或者,使用 <import/> 元素的一次或多次出现来从另一个或多个文件加载 bean 定义。例如:
<beans>
   <import resource="services.xml"/>
   <import resource="resources/messageSource.xml"/>
   <import resource="/resources/themeSource.xml"/>

   <bean id="bean1" class="..."/>
   <bean id="bean2" class="..."/>
</beans>
在上面的示例中,外部 bean 定义是从三个文件加载的,它们分别是 services.xml、messageSource.xml 和 themeSource.xml。所有位置路径都相对于执行导入动作的 bean 定义文件,因此 services.xml 必须与执行导入的文件位于相同的目录或类路径位置,而 messageSource.xml 和 themeSource.xml 必须位于导入文件位置下方的 resources 子目录。如您所见,前导斜杠会被忽略。然而,考虑到这些路径是相对的,最好不要使用斜杠。
注意:根据 Spring Schema,被导入的文件的内容,包括顶级的<beans/>元素,必须是有效的 XML bean 定义。
我们还可以使用相对的 ".. /" 路径来引用父目录中的文件(不推荐这样做),这样做会创建对当前应用程序外部文件的依赖。特别地,不建议对 classpath: URLs 使用这个引用,例如 classpath:../services.xml,因为运行时解析进程会选择 “最近的” 根类路径,然后查看它的父目录。类路径配置更改可能导致选择不同的、不正确的目录。
你始终可以使用完全限定的资源位置,而不是相对路径,例如 file:C:/config/services.xml 或 classpath:/config/services.xml。但是,请注意,您正在将应用程序的配置与特定的绝对位置耦合,不推荐这样做。对于这样的绝对位置,通常最好保留一个间接的位置 —— 例如,通过在运行时根据 JVM 系统属性解析 “${…}” 占位符,file:${basePath}/services.xml。
命名空间本身提供了导入指令特性。除了普通 bean 定义之外,Spring 还提供了一系列 XML 名称空间来提供更多的配置特性 —— 例如 context 和 util 名称空间。
使用容器
ApplicationContext 是高级工厂接口,该工厂能够维护不同 bean 及其依赖项的注册表。通过使用方法 getBean(字符串名称,Class<T> requiredType),您可以检索 bean 的实例。
ApplicationContext 允许你读取和访问 bean 定义,如下面的例子所示:
// 创建和配置bean
ApplicationContext context = new ClassPathXmlApplicationContext("services.xml", "daos.xml");

// 检索配置实例
PetStoreService service = context.getBean("petStore", PetStoreService.class);

// 使用已配置的实例
List<String> userList = service.getUsernameList();
最灵活的变体是 GenericApplicationContext 与 Reader 委托相结合,例如,与 XmlBeanDefinitionReader 一起用于 XML 文件,如下例所示:
GenericApplicationContext context = new GenericApplicationContext();
new XmlBeanDefinitionReader(context).loadBeanDefinitions("services.xml", "daos.xml");
context.refresh();
您可以在同一个 ApplicationContext 上混合和匹配这样的 Reader 委托,从不同的配置源读取 bean 定义。
然后可以使用 getBean() 来检索 bean 的实例。ApplicationContext 接口有一些其他的方法来检索 bean,但理想情况下,应用程序代码不应该使用它们。实际上,您的应用程序代码根本不应该调用 getBean() 方法,因此根本不依赖于 Spring 的 API。例如,Spring 与 Web 框架的集成为各种 Web 框架组件(如控制器和 JSF 管理的 bean)提供了依赖注入,允许您通过元数据(如自动装配注释)声明对特定 bean 的依赖。


