前面章节介绍了直接使用 Netflix Ribbon 提供的 API 实现负载均衡,本章节将介绍怎样将 Netflix Ribbon 和 Spring Cloud 进行集成。遗憾的是,Spring Cloud Hoxton.M2 版本整合新的 LoadBalancer 实现来替代 Ribbon 的版本。
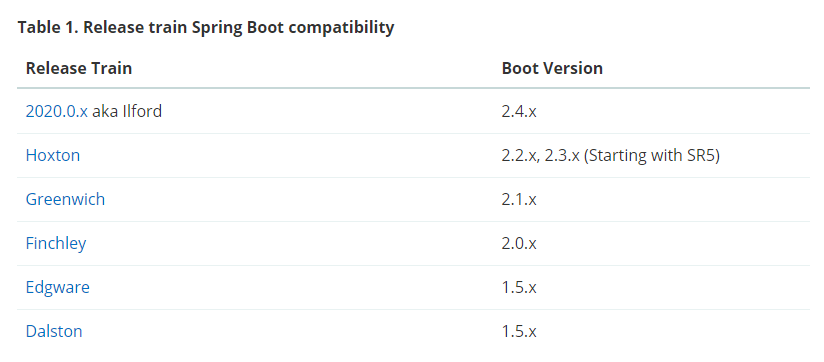
Spring Cloud 和 Spring Boot 对应版本信息如下图:
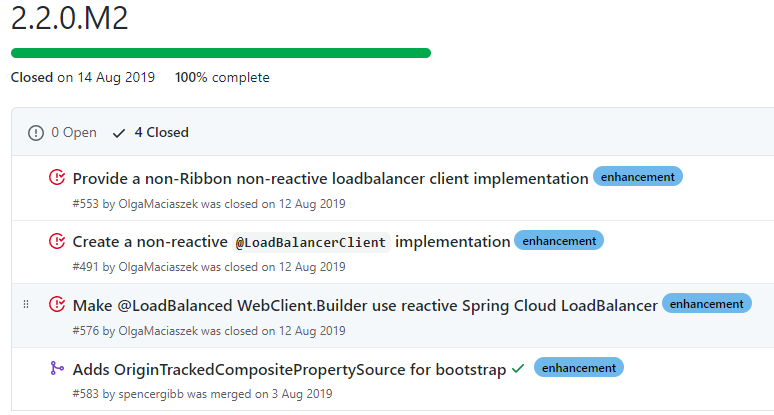
关于 Spring Cloud 整合loadBalancer 可以参考:https://github.com/spring-cloud/spring-cloud-commons/milestone/63?closed=1 ,如下图:
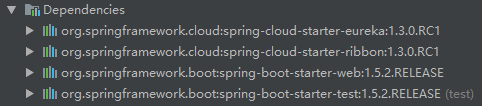
因此,本章为了验证 Netflix Ribbon 负载均衡将采用 Spring Cloud 1.3.0.RC1 版本(至少低于 Hoxton 版本),Spring Boot 1.5.2.RELEASE 版本,依赖如下:
提供 User 服务
参考“Netflix Ribbon 简单实例”章节提供的 User 服务,这里将不再赘述。需要注意的是,这里的 User 服务需要注册到 Eureka 注册中心,因此需要在 application.yml 配置文件中添加如下配置:
# 端口不需要指定,通过命令行动态指定
spring:
  application:
    name: user

# 服务地址
eureka:
  instance:
    hostname: localhost
    # 心跳间隔5s,默认30s。每一个服务配置后,心跳间隔和心跳超时时间会被保存在server端,
    # 不同服务的心跳频率可能不同,server 端会根据保存的配置来分别探活
    lease-renewal-interval-in-seconds: 5
    # 心跳超时时间10s,默认90s。从client端最后一次发出心跳后,达到这个时间没有再次发出
    # 心跳,表示服务不可用,将它的实例从注册中心移除
    lease-expiration-duration-in-seconds: 10
  client:
    service-url:
      # 注册中心路径,表示我们向这个注册中心注册服务,如果向多个注册中心注册,用“,”进行分隔
      defaultZone: http://localhost:8077/eureka
springcloud广告位
实现客户端
maven 依赖
本文将使用 Spring Boot 1.5.2.RELEASE版本,如下:
<parent>
    <groupId>org.springframework.boot</groupId>
    <artifactId>spring-boot-starter-parent</artifactId>
    <version>1.5.2.RELEASE</version>
    <relativePath/> <!-- lookup parent from repository -->
</parent>
maven 依赖如下:
<dependencies>
    <dependency>
        <groupId>org.springframework.cloud</groupId>
        <artifactId>spring-cloud-starter-eureka</artifactId>
    </dependency>
    <dependency>
        <groupId>org.springframework.cloud</groupId>
        <artifactId>spring-cloud-starter-ribbon</artifactId>
    </dependency>
    <dependency>
        <groupId>org.springframework.boot</groupId>
        <artifactId>spring-boot-starter-web</artifactId>
    </dependency>
    <dependency>
        <groupId>org.springframework.boot</groupId>
        <artifactId>spring-boot-starter-test</artifactId>
        <scope>test</scope>
    </dependency>
</dependencies>
application.yml
客户端配置文件指定端口为8080,应用名称为 demo。并且指定了 Eureka 注册中心地址,配置如下:
server:
  port: 8080

spring:
  application:
    name: demo

eureka:
  client:
    serviceUrl:
      # 指定注册中心
      defaultZone: http://localhost:8077/eureka/
RibbonConfig.java
该类是一个 @Configuration 配置类,该类配置了一个 RestTemplate Bean,并且该 RestTemplate Bean 上面应用了@LoadBalanced 注解,因此启用了负载均衡调用。代码如下:
package com.huangx.springcloud.ribbon;

import com.netflix.loadbalancer.IRule;
import com.netflix.loadbalancer.RandomRule;
import org.springframework.boot.autoconfigure.condition.ConditionalOnProperty;
import org.springframework.cloud.client.loadbalancer.LoadBalanced;
import org.springframework.context.annotation.Bean;
import org.springframework.context.annotation.Configuration;
import org.springframework.web.client.RestTemplate;

@Configuration
public class RibbonConfig {

    @Bean
    @LoadBalanced
    /** 启动负载均衡 */
    public RestTemplate restTemplate() {
        System.out.println(RibbonConfig.class.getName() + " :: restTemplate()");
        return new RestTemplate();
    }

}
HelloControler.java
实现一个简单的控制器,该控制器将分别使用 RestTemplate 和 LoadBalancerClient 实现负载均衡调用服务接口,代码如下:
package com.huangx.springcloud.ribbon;

import org.springframework.beans.factory.annotation.Autowired;
import org.springframework.cloud.client.ServiceInstance;
import org.springframework.cloud.client.loadbalancer.LoadBalancerClient;
import org.springframework.web.bind.annotation.RequestMapping;
import org.springframework.web.bind.annotation.RestController;
import org.springframework.web.client.RestTemplate;

import javax.servlet.http.HttpServletResponse;

@RestController
public class HelloControler {

   @Autowired
    private RestTemplate restTemplate;

    @Autowired
    private LoadBalancerClient loadBalancer;

    /**
     * 使用注入的 RestTemplate 实现服务调用,开启了负载均衡
     * @return
     */
    @RequestMapping(value = "/testTemplate")
    public String testTemplate(){
        // user 是服务名,下面将根据服务名进行调用,不能使用IP地址进行调用
        String str = restTemplate.getForObject("http://user/info", String.class);
        System.out.println(str);
        return str;
    }

    /**
     * 使用 LoadBalancerClient 去实现手动调用服务
     * @return
     */
    @RequestMapping(value = "/testLoadBalancerClient")
    public String testLoadBalancerClient(HttpServletResponse response) {
        response.setHeader("Content-Type", "text/html; charset=UTF-8");

        ServiceInstance instance = loadBalancer.choose("user");
        if(null == instance) {
            return "ServiceInstance is null";
        }
        // 服务地址
        String str = instance.getServiceId() + " " + instance.getHost()
                + ":" + instance.getPort();
        // 调用服务
        String url = "http://" + instance.getHost() + ":" + instance.getPort() + "/info";
        RestTemplate template = new RestTemplate();
        str += "<br/>调用结果:" + template.getForObject(url, String.class);

        System.out.println(str);
        return str;
    }

}
DemoApplication.java
客户端代码使用 @EnableDiscoveryClient 注解启用 Eureka 客户端,代码如下:
package com.huangx.springcloud.ribbon;

import org.springframework.boot.SpringApplication;
import org.springframework.boot.autoconfigure.SpringBootApplication;
import org.springframework.cloud.client.discovery.EnableDiscoveryClient;
import org.springframework.stereotype.Controller;
import org.springframework.web.bind.annotation.RequestMapping;
import javax.servlet.http.HttpServletResponse;
import java.io.PrintWriter;

@Controller
@SpringBootApplication
/** 标记这是Eureka客户端 */
@EnableDiscoveryClient
public class DemoApplication {
    public static void main(String[] args) {
        SpringApplication.run(RibbonDemo3Application.class, args);
    }
}
运行效果如下图:
后续章节将介绍怎样在 Netflix Ribbon 与 Spring Cloud 集成中指定负载均衡算法。

 川公网安备51010802032098