Hystrix 的信号量隔离机制是基于信号量来实现对不同资源或操作的隔离。它为每个受保护的资源或操作分配一个信号量,通过控制信号量的数量来限制对该资源或操作的并发访问量,从而实现资源的隔离和保护,避免某个资源的过度使用影响到其他资源。
Hystrix 中,信号量用于限制同时访问某个资源或执行某个操作的线程数量。当线程请求执行受信号量保护的操作时,如果信号量的计数器大于零,则允许线程执行,并将计数器减一;如果计数器为零,则线程将被阻塞,直到有可用的信号量。
什么是信号量?
信号量是一个整型变量,它的值表示当前可用的资源数量或允许同时访问共享资源的并发进程 / 线程数量。信号量的值可以通过两个原子操作来进行修改,即 P 操作(通常称为等待操作)和 V 操作(通常称为信号操作)。
P 操作
当一个进程或线程需要访问共享资源时,它会执行 P 操作。P 操作会将信号量的值减 1,如果信号量的值大于等于 0,则表示有可用资源,进程或线程可以继续执行并访问共享资源;如果信号量的值小于 0,则表示当前没有可用资源,进程或线程将被阻塞,并进入等待队列,直到信号量的值大于等于 0 时被唤醒。
V 操作
当一个进程或线程完成对共享资源的访问后,它会执行 V 操作。V 操作会将信号量的值加 1,如果信号量的值小于等于 0,表示有等待的进程或线程,此时会唤醒等待队列中的一个进程或线程,使其能够继续执行并访问共享资源。
工作原理
(1)配置信号量数量:在使用 Hystrix 时,需要为每个需要进行信号量隔离的命令或操作配置一个信号量的大小,这个大小表示允许同时执行该命令或操作的最大线程数量。例如,如果将某个命令的信号量配置为 10,则最多允许 10 个线程同时执行该命令。
(2)请求执行流程:当一个请求到达时,Hystrix 会首先检查对应命令的信号量是否有可用的许可。如果有可用许可,则允许请求对应的线程执行该命令,并将信号量的许可数量减一;如果没有可用许可,则请求线程将被阻塞,直到有其他线程执行完该命令并释放信号量许可。
(3)资源释放:当执行命令的线程完成操作后,会释放相应的信号量许可,使信号量的计数器加一,以便其他等待的线程能够获取许可并执行命令。
信号量隔离优缺点
优点
轻量级隔离:相比于线程池隔离,信号量隔离不需要为每个隔离的资源创建单独的线程池,因此更加轻量级,占用的系统资源较少,尤其适合在资源有限的环境中使用。
高效性能:由于不需要进行线程上下文切换等操作,信号量隔离在处理高并发请求时具有更好的性能表现,能够更快地响应请求。
简单易用:信号量隔离的配置相对简单,只需要设置信号量的大小即可,不需要像线程池隔离那样对线程池的各种参数进行复杂的配置和调优。
缺点
适用场景
高频次、低延迟的请求:对于那些执行时间较短、并发量较大的请求,如查询数据库中的某些数据、调用缓存服务等,信号量隔离能够有效地限制并发访问量,提高系统的性能和稳定性。
资源有限的环境:在资源有限的情况下,如容器化环境或小型服务器中,信号量隔离可以在不占用过多系统资源的前提下,实现对不同资源的隔离和保护。
对性能要求较高的场景:由于信号量隔离不需要进行线程上下文切换等操作,因此在对性能要求较高的场景中,如实时交易系统、金融支付系统等,可以选择使用信号量隔离来提高系统的响应速度和处理能力。
spring cloud 广告位
信号隔离示例
注解方式
第一步:使用 Maven 引入 Hystrix 的依赖,请参考“Netflix Hystrix 入门实例”
第二步:在 Spring Boot 项目的启动类上添加 @EnableCircuitBreaker 注解,开启 Hystrix 的断路器功能。
第三步:创建服务类,通过 @HystrixProperty 注解设置信号量隔离和自大并发请求数量,代码如下:
package com.hxstrive.hystrix_demo.controller;

import com.hxstrive.hystrix_demo.dto.CommonReturn;
import com.hxstrive.hystrix_demo.entity.User;
import com.hxstrive.hystrix_demo.service.UserService;
import com.netflix.hystrix.contrib.javanica.annotation.HystrixCommand;
import com.netflix.hystrix.contrib.javanica.annotation.HystrixProperty;
import org.springframework.beans.factory.annotation.Autowired;
import org.springframework.web.bind.annotation.GetMapping;
import org.springframework.web.bind.annotation.RequestMapping;
import org.springframework.web.bind.annotation.RequestParam;
import org.springframework.web.bind.annotation.RestController;

import javax.servlet.http.HttpServletResponse;

/**
 * Hystrix 信号量隔离
 * @author hxstrive.com
 */
@RestController
@RequestMapping("/demo6")
public class Demo6Controller {

    @Autowired
    private UserService userService;

    @GetMapping("/getUserById")
    // 使用HystrixCommand注解来标记这个方法受Hystrix管控,并配置信号量隔离相关属性
    @HystrixCommand(fallbackMethod = "fallback",
            commandProperties = {
                    // 设置隔离策略为信号量隔离
                    @HystrixProperty(name = "execution.isolation.strategy", value = "SEMAPHORE"),
                    // 设置信号量最大并发请求数量,这里设为3
                    @HystrixProperty(name = "execution.isolation.semaphore.maxConcurrentRequests", value = "3")
    })
    public CommonReturn<User> getUserById(HttpServletResponse response, @RequestParam Long id) {
        try {
            Thread.sleep(400);
        } catch (InterruptedException e) {
            throw new RuntimeException(e);
        }
        return userService.getUserById(id);
    }

    /**
     * 当服务调用失败时,调用此方法
     */
    private CommonReturn<User> fallback(HttpServletResponse response, Long id) {
        response.setStatus(500);
        return CommonReturn.fail("网络出现问题,调用 fallback 方法,id=" + id);
    }

}
重启服务,使用 JMeter(JMeter 是 Apache 组织开发的基于 Java 的压力测试工具,用于对软件系统进行性能测试、功能测试以及回归测试等)进行测试,步骤如下:
(1)下载 jmeter,地址 https://dlcdn.apache.org//jmeter/binaries/apache-jmeter-5.6.3.zip
(2)将压缩包解压到你想要的位置,这里解压到 D 盘
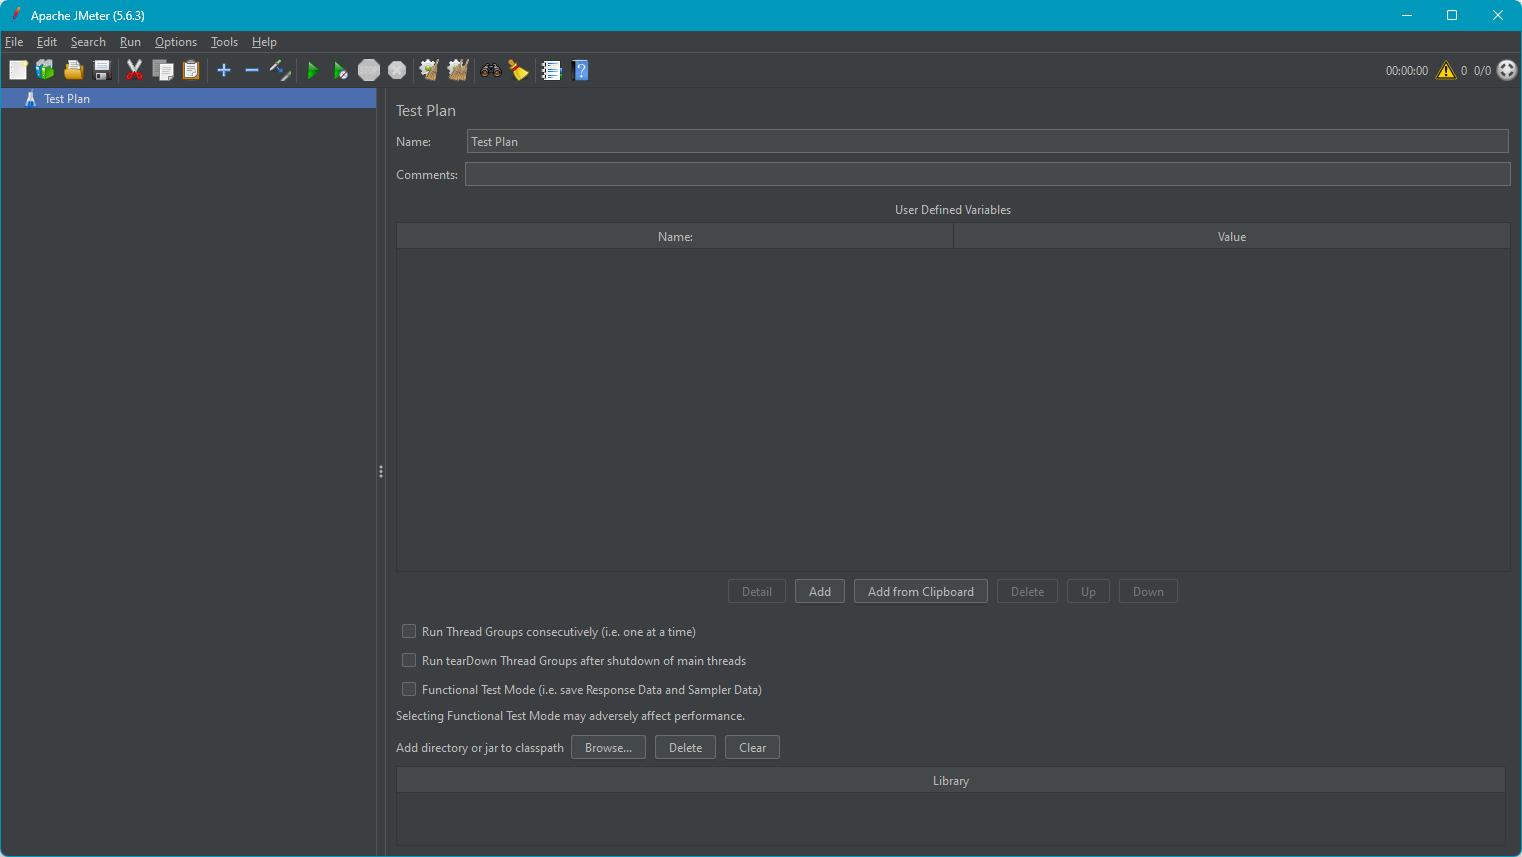
(3)进入 jmeter 的 bin 目录,运行 jmeter.bat,启动 jmeter,如下图:

点击  图标,快速创建 HTTP 测试计划,选择“Simple HTTP request”模板,然后点击“Create”按钮创建,如下图:

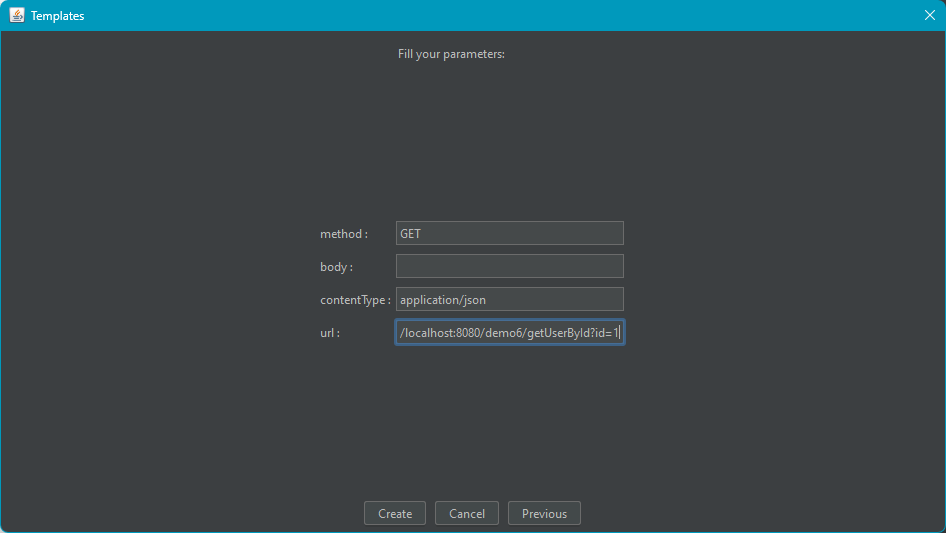
在创建 HTTP 请求面板中填写 method 为 GET,url 地址为 http://localhost:8080/demo6/getUserById?id=1,点击“Create”按钮创建,如下图:

在创建成功的测试计划中,选中“Therad Group”选项,填写要进行压测的线程数等信息如下图:

其中:
Number of Threads(线程数):表示模拟的并发用户数量。在上述示例中,设置为 10,即 JMeter 将模拟 10 个并发用户同时向服务器发送请求。这类似于 10 个真实用户在同一时刻对系统执行相同的操作,通过这种方式可以测试系统在多用户并发访问时的性能表现。
Ramp-up period(启动时间):指所有线程在多长时间内全部启动完成。在给定的示例中,Ramp-up period 为 1 秒,表示 JMeter 会在 1 秒内启动 10 个线程。
Loop Count(循环次数):表示每个线程发送请求的重复次数。这里设置为 1,意味着每个模拟用户会执行 1 次请求。
最后,点击  按钮开始测试,测试结果如下图:

spring cloud 广告位
代码方式
通过继承 HystrixCommand 类的方式实现信号量隔离。详细步骤如下:
(1)创建一个 RemoteService 接口,如下:
package com.hxstrive.hystrix_demo.semaphore_demo;

import com.hxstrive.hystrix_demo.dto.CommonReturn;
import com.hxstrive.hystrix_demo.entity.User;
import java.util.List;

public interface RemoteService {

    CommonReturn<List<User>> getAllUsers();

}
(2)实现 RemoteService 接口,使用 RestTemplate 调用远程服务,如下:
package com.hxstrive.hystrix_demo.semaphore_demo;

import com.hxstrive.hystrix_demo.dto.CommonReturn;
import com.hxstrive.hystrix_demo.entity.User;
import org.springframework.beans.factory.annotation.Autowired;
import org.springframework.core.ParameterizedTypeReference;
import org.springframework.http.HttpMethod;
import org.springframework.http.ResponseEntity;
import org.springframework.stereotype.Service;
import org.springframework.web.client.RestTemplate;
import java.util.List;

@Service
public class RemoteServiceImpl implements RemoteService {

    @Autowired
    private RestTemplate restTemplate;

    // 调用根据用户ID获取用户信息的接口
    @Override
    public CommonReturn<List<User>> getAllUsers() {
        try {
            Thread.sleep(800);
        } catch (InterruptedException e) {
            throw new RuntimeException(e);
        }
        // 如果你要实现负载均衡,调用地址不能写具体主机地址
        // 需要将主机地址替换成对于服务的服务名,即 spring.application.name 指定的值
        // 你也可以到 Eureka server 中去查看
        String url = "http://SERVICE-DEMO/user/getAllUsers";
        // 使用 ParameterizedTypeReference 来保留泛型信息
        ParameterizedTypeReference<CommonReturn<List<User>>> typeRef = new ParameterizedTypeReference<CommonReturn<List<User>>>() {};
        ResponseEntity<CommonReturn<List<User>>> responseEntity = restTemplate.exchange(url, HttpMethod.GET, null, typeRef);
        return responseEntity.getBody();
    }

}
(3)继承 HystrixCommand 类,实现自定义的 Command,如下:
package com.hxstrive.hystrix_demo.semaphore_demo;

import com.hxstrive.hystrix_demo.dto.CommonReturn;
import com.hxstrive.hystrix_demo.entity.User;
import com.netflix.hystrix.HystrixCommand;
import com.netflix.hystrix.HystrixCommandGroupKey;
import com.netflix.hystrix.HystrixCommandProperties;
import org.springframework.beans.factory.annotation.Autowired;
import org.springframework.stereotype.Component;
import java.util.List;

public class RemoteServiceCommand extends HystrixCommand<CommonReturn<List<User>>> {

    private final RemoteService remoteService;

    public RemoteServiceCommand(RemoteService remoteService) {
        // 设置信号量等信息
        super(Setter.withGroupKey(HystrixCommandGroupKey.Factory.asKey("RemoteServiceGroup"))
                .andCommandPropertiesDefaults(HystrixCommandProperties.Setter()
                        .withExecutionIsolationStrategy(HystrixCommandProperties.ExecutionIsolationStrategy.SEMAPHORE)
                        .withExecutionIsolationSemaphoreMaxConcurrentRequests(5)));
        this.remoteService = remoteService;
    }

    @Override
    protected CommonReturn<List<User>> run() throws Exception {
        return remoteService.getAllUsers();
    }

    @Override
    protected CommonReturn<List<User>> getFallback() {
        return CommonReturn.fail("Call fallback");
    }

}
(4)调用上述自定义的 Command,实现信号量隔离,如下:
package com.hxstrive.hystrix_demo.controller;

import com.hxstrive.hystrix_demo.dto.CommonReturn;
import com.hxstrive.hystrix_demo.entity.User;
import com.hxstrive.hystrix_demo.semaphore_demo.RemoteService;
import com.hxstrive.hystrix_demo.semaphore_demo.RemoteServiceCommand;
import org.springframework.beans.factory.annotation.Autowired;
import org.springframework.web.bind.annotation.GetMapping;
import org.springframework.web.bind.annotation.RequestMapping;
import org.springframework.web.bind.annotation.RestController;

import java.util.List;

/**
 * Hystrix 信号量隔离
 * @author hxstrive.com
 */
@RestController
@RequestMapping("/demo5")
public class Demo5Controller {

    @Autowired
    private RemoteService remoteService;

    @GetMapping("/getAllUsers")
    public CommonReturn<List<User>> getAllUsers() {
        RemoteServiceCommand remoteServiceCommand = new RemoteServiceCommand(remoteService);
        CommonReturn<List<User>> commonReturn = remoteServiceCommand.execute();
        if(commonReturn.getCode() != 1) {
            throw new RuntimeException("获取用户列表失败,原因:" + commonReturn.getMessage());
        }
        return commonReturn;
    }

}
上述就是使用代码方式实现信号隔离的详细步骤,读者可以自行尝试。


 图标,快速创建 HTTP 测试计划,选择“


 按钮开始测试,测试结果如下图:
