本文将介绍怎样通过RabbitMQ搭建MQTT服务,然后使用MQTTX工具发布和订阅消息。
本文将介绍怎样使用 RabbitMQ 搭建 MQTT 服务,然后使用 MQTTX 工具进行 MQTT 报文发布和订阅。
RabbitMQ 配置
安装 RabbitMQ
怎样安装 RabbitMQ 服务,请参考 Windows 下安装RabbitMQ 或 Linux 下安装 RabbitMQ。
RabbitMQ 启用 MQTT
默认情况下,RabbitMQ 没有开启 MQTT 服务。因此,我们需要手动启动 MQTT 服务功能。
Windows
(1)查看 RabbitMQ 自带中关于 mqtt 的插件,命令如下:
C:\Users\Administrator> rabbitmq-plugins list | findstr mqtt
[  ] rabbitmq_mqtt                     3.9.11
[  ] rabbitmq_web_mqtt                 3.9.11
[  ] rabbitmq_web_mqtt_examples        3.9.11
(2)启动 rabbitmq_mqtt 插件,命令如下:
C:\Users\Administrator> rabbitmq-plugins enable rabbitmq_mqtt
Enabling plugins on node hello@hxstrive:
rabbitmq_mqtt
The following plugins have been configured:
  rabbitmq_federation
  rabbitmq_management
  rabbitmq_management_agent
  rabbitmq_mqtt
  rabbitmq_web_dispatch
Applying plugin configuration to hello@hxstrive...
The following plugins have been enabled:
  rabbitmq_mqtt

set 5 plugins.
Offline change; changes will take effect at broker restart.
(3)启动 rabbitmq_web_mqtt 插件,命令如下:
C:\Users\Administrator> rabbitmq-plugins enable rabbitmq_web_mqtt
Enabling plugins on node hello@hxstrive:
rabbitmq_web_mqtt
The following plugins have been configured:
  rabbitmq_federation
  rabbitmq_management
  rabbitmq_management_agent
  rabbitmq_mqtt
  rabbitmq_web_dispatch
  rabbitmq_web_mqtt
Applying plugin configuration to hello@hxstrive...
The following plugins have been enabled:
  rabbitmq_web_mqtt

set 6 plugins.
Offline change; changes will take effect at broker restart.
Linux
(1)查看 RabbitMQ 自带中关于 mqtt 的插件,命令如下:
[root@hxstrive ~]# rabbitmq-plugins list | grep mqtt
[  ] rabbitmq_mqtt                     3.9.14
[  ] rabbitmq_web_mqtt                 3.9.14
[  ] rabbitmq_web_mqtt_examples        3.9.14
(2)启动 rabbitmq_mqtt 插件,命令如下:
[root@hxstrive ~]# rabbitmq-plugins enable rabbitmq_mqtt
Enabling plugins on node rabbit@hxstrive:
rabbitmq_mqtt
The following plugins have been configured:
  rabbitmq_federation
  rabbitmq_federation_management
  rabbitmq_management
  rabbitmq_management_agent
  rabbitmq_mqtt
  rabbitmq_web_dispatch
Applying plugin configuration to rabbit@hxstrive...
The following plugins have been enabled:
  rabbitmq_mqtt

set 6 plugins.
Offline change; changes will take effect at broker restart.
(3)启动 rabbitmq_web_mqtt 插件,命令如下:
[root@hxstrive ~]# rabbitmq-plugins enable rabbitmq_web_mqtt
Enabling plugins on node rabbit@hxstrive:
rabbitmq_web_mqtt
The following plugins have been configured:
  rabbitmq_federation
  rabbitmq_federation_management
  rabbitmq_management
  rabbitmq_management_agent
  rabbitmq_mqtt
  rabbitmq_web_dispatch
  rabbitmq_web_mqtt
Applying plugin configuration to rabbit@hxstrive...
The following plugins have been enabled:
  rabbitmq_web_mqtt

set 7 plugins.
Offline change; changes will take effect at broker restart.
rabbitmq广告位
创建 MQTT 交换器
使用浏览器访问 http://127.0.0.1:15672/#/exchanges 地址,点击“Add a new exchange”按钮去添加Exchange交换器。如下图:
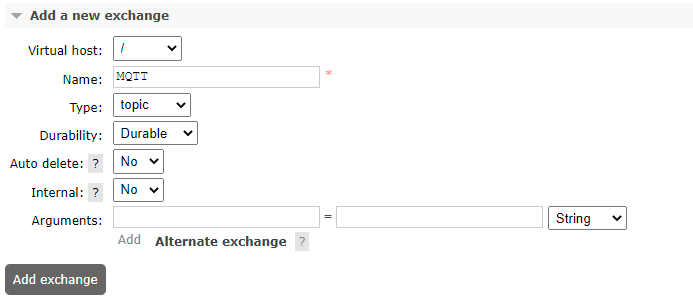
上图中,在默认虚拟主机(/)下创建了一个名为 MQTT,类型为 topic 的 exchange 交换器。
注意:这里交换器类型为 topic 非常重要,否则 MQTT 消息发送/接收会失败。
创建好的交换器如下图:
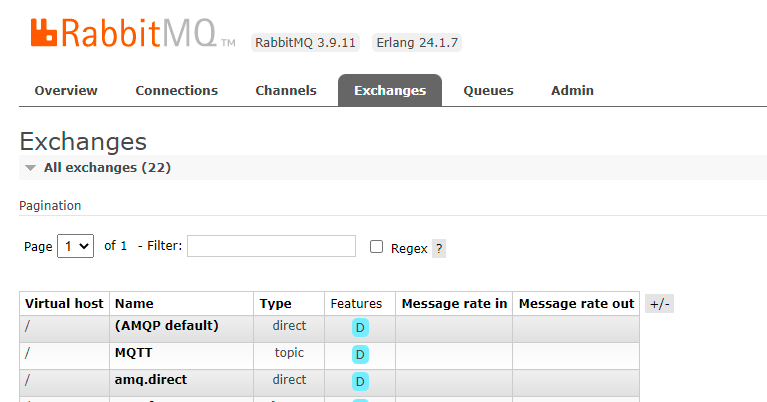
到这里,使用 RabbitMQ 搭建 MQTT 服务就完成了。
接下来将使用 MQTTX 工具演示 MQTT 消息的推送和订阅。
MQTTX 工具
安装 MQTTX
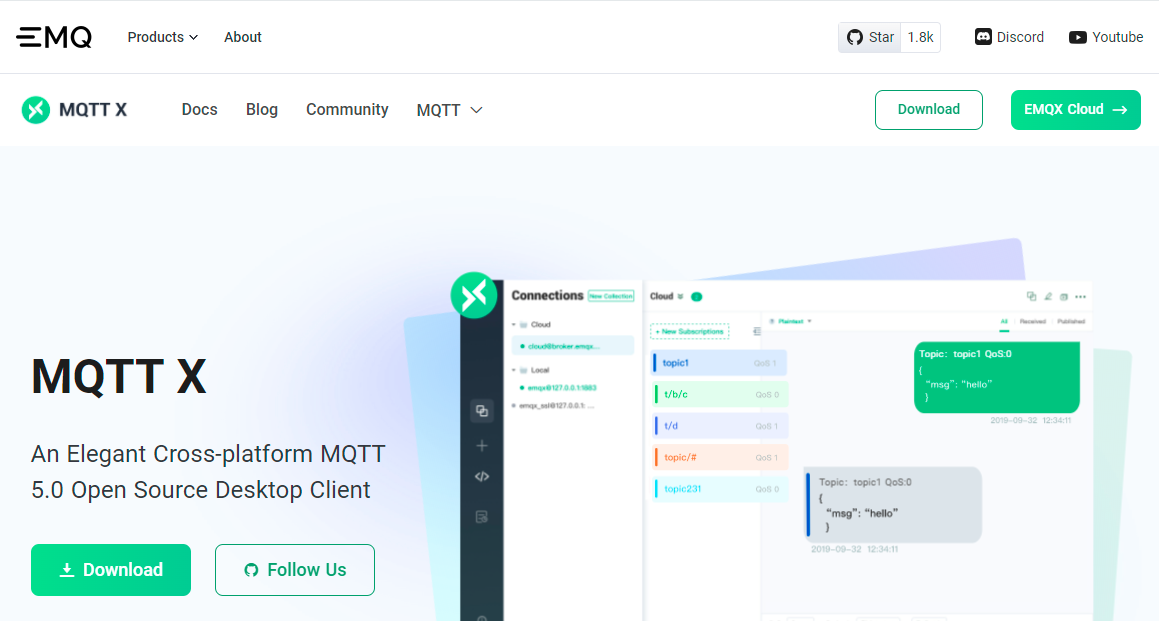
访问 https://mqttx.app 地址,进入 MQTTX 官网。如下图:
点击右上角的“Download”按钮跳转到下载链接位置,如下图:

读者根据自己操作系统类型选择合适的安装包即可。
安装包下载完成后,运行安装包,根据提示信息一步步安装即可,这里就不再赘述。
创建服务端
使用 MQTTX 工具创建一个服务端,用来向 MQTT 服务器推送消息。点击“+ New Connection”按钮创建连接,如下图:
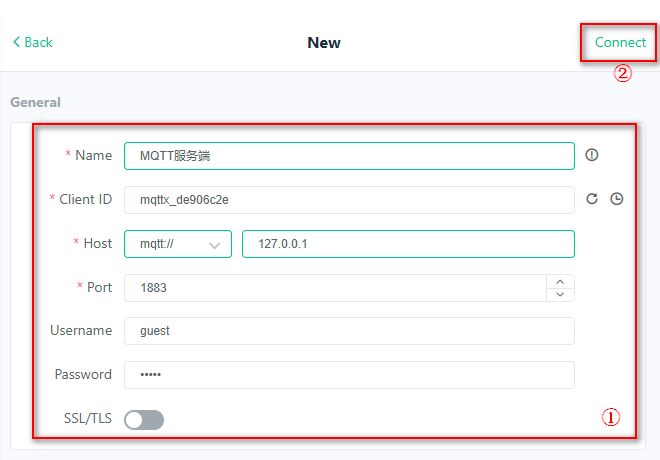
上图中,根据自己的情况填写区域①中的信息。笔者的连接名称为“MQTT服务端”,HOST为“mqtt://127.0.0.1”,端口为1883,用户名呢和密码均为 guest(你也可以到 RabbitMQ 中创建其他用户)。然后点击“Connect”按钮,连接到 MQTT 服务。
创建客户端
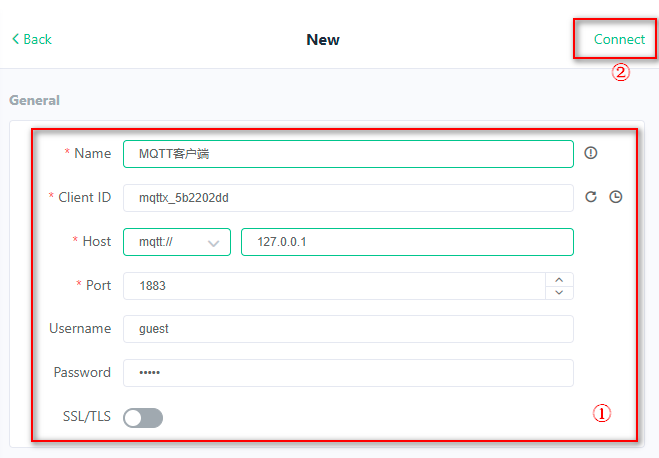
采用创建服务端同样的方式创建客户端,如下图:
订阅 MQTT 消息
点击上面创建的“MQTT客户端”连接,如下图:

点击“+ New Subscription”按钮,添加订阅信息。如下图:
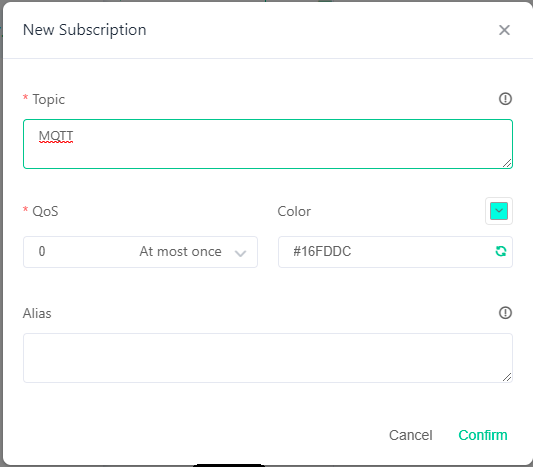
上图中,将 Topic 栏设置为“MQTT”,MQTT为我们在 RabbitMQ 中创建的 exchange 交换器名称,QoS 保持默认值。
推送 MQTT 消息
点击上面创建的“MQTT客户端”连接打开消息主页面,如下图:
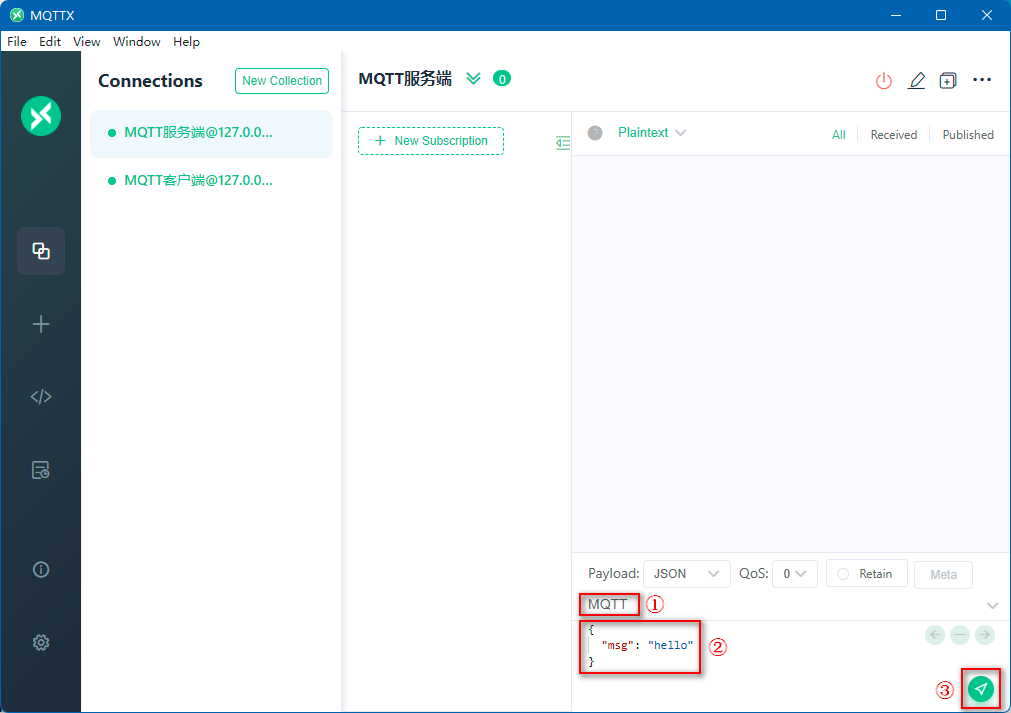
在上图的右下角,填写 Topic 为 MQTT,消息内容为:
{
    "msg": "hello"
}
然后,点击发送按钮③推送消息。消息发送成功后,MQTT服务端连接界面如下:
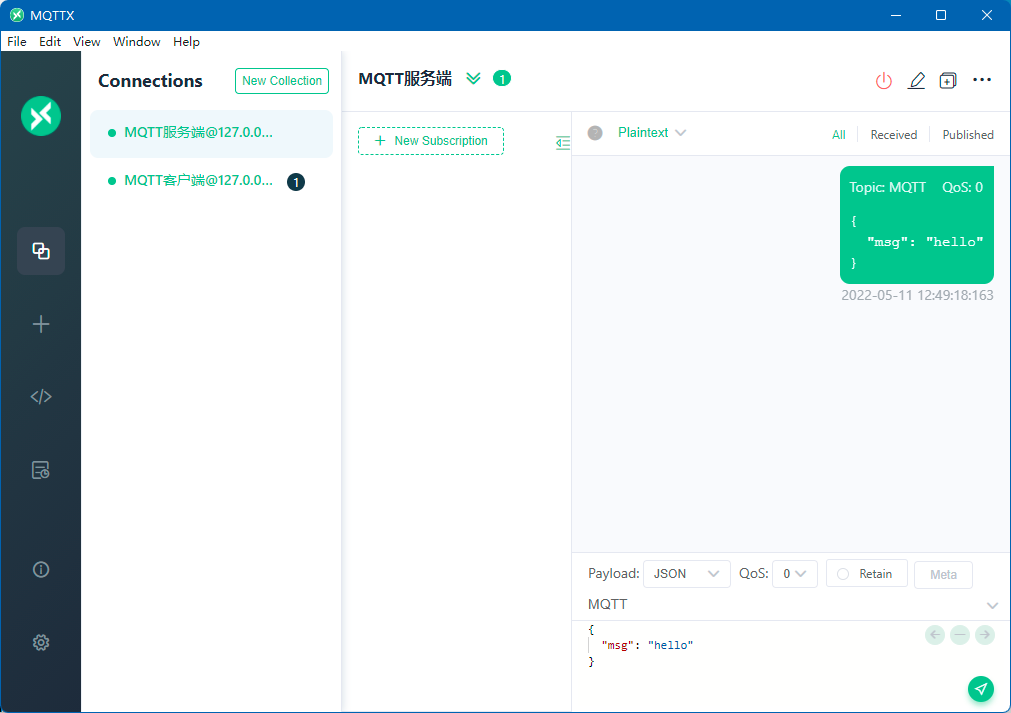
MQTT客户端连接界面如下:
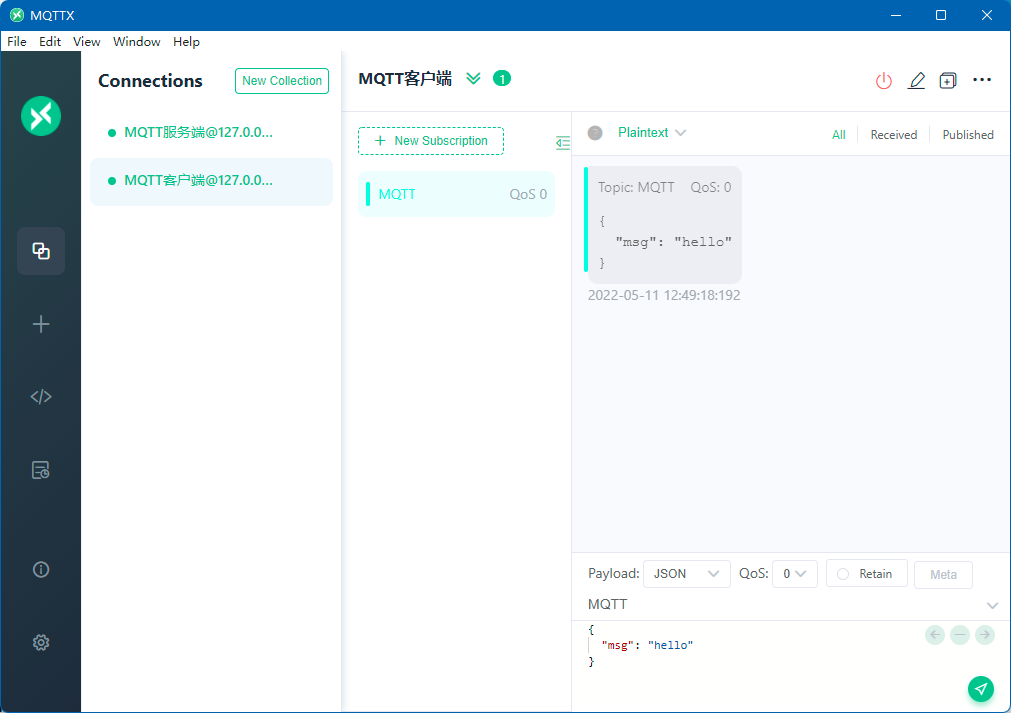
从上图可知,MQTT客户端成功收到消息。


