本文将介绍怎样在CentOS Stream9系统中安装RabbitMQ服务。
准备工作
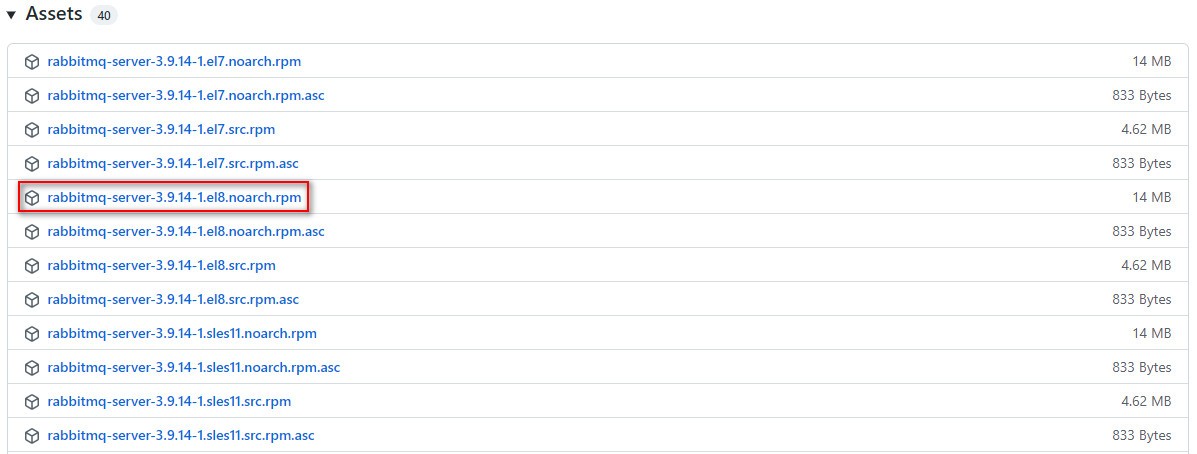
使用浏览器访问 https://github.com/rabbitmq/rabbitmq-server/releases/tag/v3.9.14 地址,下载 RabbitMQ 安装包。如下图:

下载地址:https://objects.githubusercontent.com/github-production-release-asset-2e65be/924551/0187d612-506b-4f7e-82a1-6eb5c7eb1ac3?X-Amz-Algorithm=AWS4-HMAC-SHA256&X-Amz-Credential=AKIAIWNJYAX4CSVEH53A%2F20220403%2Fus-east-1%2Fs3%2Faws4_request&X-Amz-Date=20220403T141503Z&X-Amz-Expires=300&X-Amz-Signature=93c08cf0bc642d201e36ae16dbfc9e972e6466908ecba2043f3f579454eef659&X-Amz-SignedHeaders=host&actor_id=0&key_id=0&repo_id=924551&response-content-disposition=attachment%3B%20filename%3Drabbitmq-server-3.9.14-1.el8.noarch.rpm&response-content-type=application%2Foctet-stream
linux广告位
开始安装
(1)RabbitMQ 是 Erlang 编写的,因此需先安装 Erlang,安装教程参考 CentOS Stream9 安装 Erlang
(2)执行 dnf install 命令,安装 RabbitMQ 的 rpm 包。命令如下:
[root@hxstrive ~]# dnf install rabbitmq-server-3.9.14-1.el8.noarch.rpm
Last metadata expiration check: 2:24:58 ago on Sun 03 Apr 2022 08:26:56 PM CST.
Dependencies resolved.
=====================================================================================================================================
 Package                            Architecture              Version                          Repository                       Size
=====================================================================================================================================
Installing:
 rabbitmq-server                    noarch                    3.9.14-1.el8                     @commandline                     14 M

Transaction Summary
=====================================================================================================================================
Install  1 Package

Total size: 14 M
Installed size: 19 M
Is this ok [y/N]: y
Downloading Packages:
Running transaction check
Transaction check succeeded.
Running transaction test
Transaction test succeeded.
Running transaction
  Preparing        :                                                                                                             1/1
  Running scriptlet: rabbitmq-server-3.9.14-1.el8.noarch                                                                         1/1
  Installing       : rabbitmq-server-3.9.14-1.el8.noarch                                                                         1/1
  Running scriptlet: rabbitmq-server-3.9.14-1.el8.noarch                                                                         1/1
/usr/lib/tmpfiles.d/rabbitmq-server.conf:1: Line references path below legacy directory /var/run/, updating /var/run/rabbitmq → /run/rabbitmq; please update the tmpfiles.d/ drop-in file accordingly.

  Verifying        : rabbitmq-server-3.9.14-1.el8.noarch                                                                         1/1

Installed:
  rabbitmq-server-3.9.14-1.el8.noarch

Complete!
如果你能在最后看见“Complete!”,则说明 RabbitMQ 安装完成了。
如果你是为了学习 RabbitMQ,通常我们还需要安装 rabbitmq_management 插件,方便对 RabbitMQ 服务器进行管理。命令如下:
[root@hxstrive ~]# rabbitmq-plugins enable rabbitmq_management
Enabling plugins on node rabbit@hxstrive:
rabbitmq_management
The following plugins have been configured:
  rabbitmq_management
  rabbitmq_management_agent
  rabbitmq_web_dispatch
Applying plugin configuration to rabbit@hxstrive...
The following plugins have been enabled:
  rabbitmq_management
  rabbitmq_management_agent
  rabbitmq_web_dispatch

set 3 plugins.
Offline change; changes will take effect at broker restart.
验证安装
(1)启动 rabbitmq 服务,命令如下:
[root@hxstrive ~]# rabbitmq-server start
2022-04-03 22:55:44.264750+08:00 [info] <0.228.0> Feature flags: list of feature flags found:
2022-04-03 22:55:44.278228+08:00 [info] <0.228.0> Feature flags:   [x] implicit_default_bindings
2022-04-03 22:55:44.278355+08:00 [info] <0.228.0> Feature flags:   [x] maintenance_mode_status
2022-04-03 22:55:44.278380+08:00 [info] <0.228.0> Feature flags:   [x] quorum_queue
2022-04-03 22:55:44.278398+08:00 [info] <0.228.0> Feature flags:   [x] stream_queue
2022-04-03 22:55:44.278501+08:00 [info] <0.228.0> Feature flags:   [x] user_limits
2022-04-03 22:55:44.278534+08:00 [info] <0.228.0> Feature flags:   [x] virtual_host_metadata
2022-04-03 22:55:44.278559+08:00 [info] <0.228.0> Feature flags: feature flag states written to disk: yes
2022-04-03 22:55:44.620860+08:00 [noti] <0.44.0> Application syslog exited with reason: stopped
2022-04-03 22:55:44.620964+08:00 [noti] <0.228.0> Logging: switching to configured handler(s); following messages may not be visible in this log output

  ##  ##      RabbitMQ 3.9.14
  ##  ##
  ##########  Copyright (c) 2007-2022 VMware, Inc. or its affiliates.
  ######  ##
  ##########  Licensed under the MPL 2.0. Website: https://rabbitmq.com

  Erlang:      24.3.3 [jit]
  TLS Library: OpenSSL - OpenSSL 3.0.1 14 Dec 2021

  Doc guides:  https://rabbitmq.com/documentation.html
  Support:     https://rabbitmq.com/contact.html
  Tutorials:   https://rabbitmq.com/getstarted.html
  Monitoring:  https://rabbitmq.com/monitoring.html

  Logs: /var/log/rabbitmq/rabbit@hxstrive.log
        /var/log/rabbitmq/rabbit@hxstrive_upgrade.log
        <stdout>

  Config file(s): (none)

  Starting broker... completed with 3 plugins.
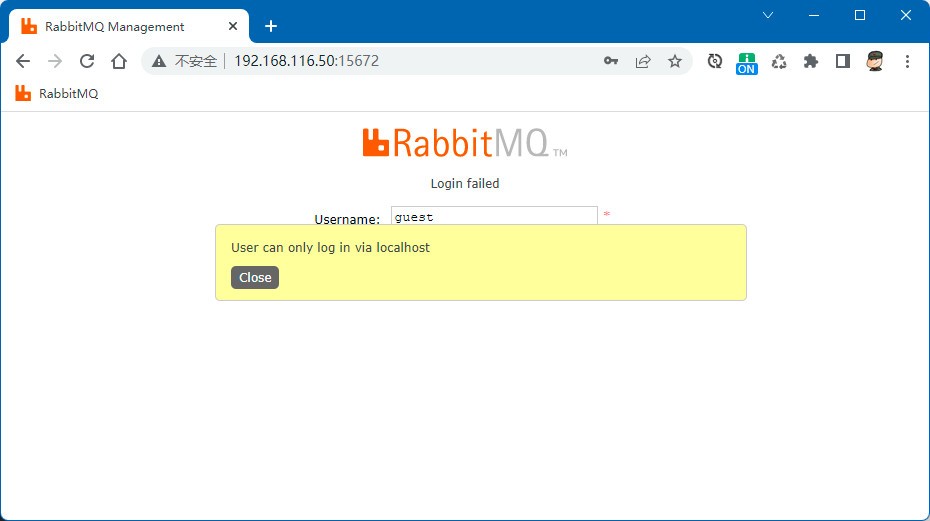
(2)使用浏览器访问 http://192.168.116.50:15672 地址,笔者可以根据自己实际服务器 IP 地址替换 URL 中的 IP 地址。当我们成功访问到页面后,使用 guest 账户登录报错,如下图:

这是因为 RabbitMQ 只允许 guest 账户在 localhost 下面登录。解决方法,修改 /etc/rabbitmq/rabbitmq.config 文件(如果该文件不存在,创建一个即可),内容如下:
[{
    rabbit, [{
        loopback_users, []
    }]
}].
注意:上面 loopback_users 配置是关键点,不限制只允许 localhost 登录的用户。
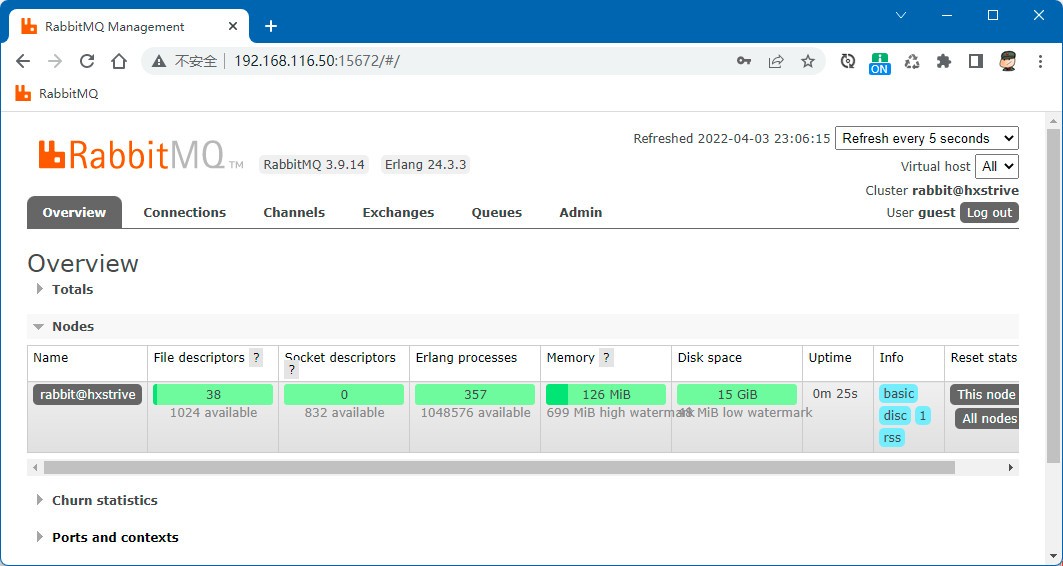
修改完成后,重启 rabbitmq 服务,再次登录,如下图:

注意:
有些比较低的 RabbitMQ 版本是通过修改 sbin/rabbitmq.app 文件,把其中的内容直接修改成:
[{rabbit, [{loopback_users, []}]}]再重启 RabbitMQ 即可。
学习知识要善于思考,思考,再思。我就是靠这个方法成为科学家的。 —— 爱因斯坦


[root@192 software]# dnf install rabbitmq-server-3.11.0-1.el8.noarch.rpm
正在更新 Subscription Management 软件仓库。
无法读取客户身份
本系统尚未在权利服务器中注册。可使用 subscription-manager 进行注册。
CentOS-9 - Base - mirrors.aliyun.com 106 B/s | 2.3 kB 00:21
Errors during downloading metadata for repository 'base':
- Status code: 404 for http://mirrors.aliyun.com/centos/9/os/x86_64/repodata/repomd.xml (IP: 183.2.193.218)
- Curl error (7): Couldn't connect to server for http://mirrors.aliyuncs.com/centos/9/os/x86_64/repodata/repomd.xml [Failed to connect to mirrors.aliyuncs.com port 80: 拒绝连接]
- Curl error (6): Couldn't resolve host name for http://mirrors.cloud.aliyuncs.com/centos/9/os/x86_64/repodata/repomd.xml [Could not resolve host: mirrors.cloud.aliyuncs.com]
错误:为仓库 'base' 下载元数据失败 : Cannot download repomd.xml: Cannot download repodata/repomd.xml: All mirrors were tried
原因是由于非阿里云ECS用户无法解析主机“mirrors.cloud.aliyuncs.com”,只需将CentOS-Base里包含aliyuncs.com的行删除即可。
1、备份原来源
mv /etc/yum.repos.d/CentOS-Base.repo /etc/yum.repos.d/CentOS-Base.repo.backup
2、下载阿里源
wget -O /etc/yum.repos.d/CentOS-Base.repo http://mirrors.aliyun.com/repo/Centos-7.repo
3、替换源地址
sed -i -e '/mirrors.cloud.aliyuncs.com/d' -e '/mirrors.aliyuncs.com/d' /etc/yum.repos.d/CentOS-Base.repo
4、刷新缓存
yum makecache
5、更新
yum -y update